The New Year is approaching, which means that a magical time of miracles is coming, in which not only children, but also adults believe. A tradition has taken root that if you decorate a Christmas tree with beautiful decorations made with your own hands, and at the same time make a wish, then when the chimes strike, it will certainly come true. In this article we will tell you how make a Christmas tree decoration with your own hands.
Paper is a universal material for needlework. You can use it to make extraordinary New Year’s decorations not only for the Christmas tree, but also for your home.
The modern market offers us many options for handmade paper materials. These include:
- Cardboard
- Corrugated paper
- Self-adhesive paper
- Colored paper of different weights
In addition to decorative paper materials, you can also use old postcards, newspapers, and magazine sheets to make New Year's decor. You just have to show your imagination and creativity to make original ones DIY Christmas tree decorations made of paper, We’ll tell you later what techniques are best to use.
Toy made from paper tubes using scrapbooking technique
We invite you to decorate your Christmas tree this year with this beautiful snowflake:

To make it you will need the following material:
- Several varieties of colored cardboard (two sheets will be enough)
- Scrapbooking paper (you will also need 2 sheets)
- Scissors, high-quality glue (preferably quick-drying or heat gun)
- Braid of any color and fastening from an old chain (in the form of a ring)
When you have all the materials for work in your hands, proceed to complete this DIY Christmas tree decorations made from cardboard. It won’t take much time – literally half an hour, maximum 40 minutes. The algorithm of actions should be as follows:
- Prepare squares of colored cardboard of different sizes. 14 pieces should have sides of 2.5 cm, and 14 should have sides of 3 cm.

- Make tubes from the resulting squares, gluing their ends together to form a rhombus.
- Make a circle out of cardboard (its diameter should be 5 cm).

- Mark the middle on this circle and start gluing the tubes one after another. The first row should consist of large tubes, and the second - of smaller ones.

- Decorate the resulting snowflake with rhinestones, a brooch, attach a braid and a chain attachment to it - the decoration is ready and can be used for its intended purpose.
New Year's paper toy in quilling style
You can do something like this DIY Christmas tree toy for school:

After all, every year on the eve of the New Year holidays, children are given homework to prepare an original decoration for the Christmas tree using improvised materials. The quilling technique is the best in this regard, because you don’t need to spend money on decorative paper, you can use:
- ordinary newspaper sheets
- baking molds (in the form of stars or hearts)
- minimum office supplies - glue, scissors and varnish
- braid for attaching the toy to the Christmas tree
Making the toy is very simple:
- Cut out many different strips of 5 cm wide from newspapers and fold them in half lengthwise towards the center. For an example of how this should look, see the image below:

- Twist each strip into circles, gluing them so that they do not fall apart. They should look like this:

- Place the base of the future toy in strips in a baking dish (along its perimeter). In our case it will be like this asterisk:

- Lubricate the base with glue and fill the mold with circles (they will also need to be glued together).
- When the toy is dry, open it with colorless varnish, and then remove it from the mold, thread it through the braid and hang it on the Christmas tree.

DIY paper ball toys for the Christmas tree
Some people throw away old books, but from their shabby, already yellowed pages you can create such a very beautiful three-dimensional Christmas tree ball:

In addition to book pages, you will need:
- Fast drying glue
- Any container that you circle to make circles out of paper, or a compass
- Scissors
- Chopped glitter
- Paper clips
- Braid
- Needle and thread or sewing machine
Creating this paper Christmas tree decoration will not take much of your time. In half an hour you will make an original decoration if you follow this procedure:
- Cut out circles from book paper

- Sew them in the middle using a sewing machine or needle and thread

- Using paper clips in a checkerboard pattern, clamp the edges together as in the photo:

- These edges need to be glued together to form a ball:

- Fill the resulting holes with glitter or use other decor.

All that remains is to attach a ribbon to the toy and hang it on the Christmas tree.
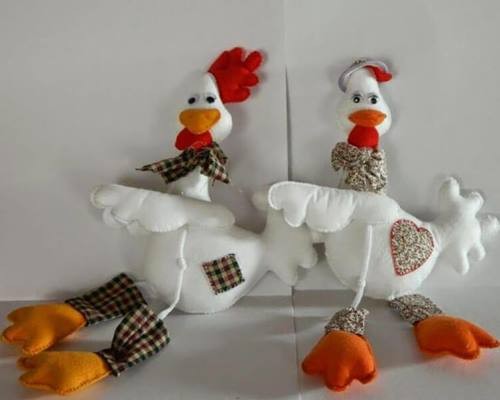
DIY Christmas tree decoration made from fabric
Fabric ranks second among the materials most often used to create Christmas tree decorations. Such toys are very practical, as they do not break. In addition, they look very bright and are completely safe for children. They can be made flat, but they look much more attractive if they are filled with some material, for example, padding polyester or cotton wool, so that they gain volume.

Since the Fire Rooster will be the patron of 2017, we offer you an example of making DIY toys for the Christmas tree, symbolizing the year of the rooster.
To make it you will need the following material:
- Fabric 5 different colors
- Buttons for making eyes for a cockerel
- Sintepon
- Braid
- Pattern
- Thread and needle

- Using this pattern, you cut the fabric, then gradually sew the parts together, gradually filling them with padding polyester.
- Seams can be reversed
- When the product is ready, sew a braid to it, with which you will hang the toy on the Christmas tree
In addition to the symbol of the coming year, you can make others DIY soft toys for the Christmas tree:
- Boots
- Mittens
- Birds
- Asterisks
We have attached the DIY Christmas tree decoration patterns that we have listed for you in this article:


DIY felt Christmas tree toys
Felt is a material that does not require additional processing in the process of making Christmas tree decorations. You can make a huge number of toys from it for the New Year. We will tell you about the simplest but original options.
Felt Christmas tree

- Cut out 5 circles of different diameters from green felt. The maximum diameter should not exceed 10 cm.
- In each circle you need to make a cutout in the form of a triangle, such as shown in the photo below:

- Make cones from these circles, the ends of which need to be glued with quick-drying glue.

- From the cones, assemble a pyramid and sew it with thread. Attach a ribbon to the top.

- Make a Christmas tree trunk from brown felt - cut out a rectangle, twist it into a tube and sew it to the Christmas tree so that the toy looks like this:

Felt candies

- Cut strips from felt, the width of which is 1 cm and the length is 20 cm

- Glue 6 strips of three different colors together

- Twist the resulting volumetric strips into a circle

- Attach sticks and braid to these circles so that you get these Christmas tree decorations:

Crochet Christmas tree toys
Few people master the art of crocheting, because this activity is very painstaking, requiring time and certain knowledge. But with the help of a hook and knitting threads you can make a very simple but original decoration for old New Year's glass balls.

Here are a few Christmas tree toy schemes crochet:


DIY Christmas tree toy from a bottle
The most popular toys on the New Year tree are snowflakes, because they symbolize the onset of winter and the holidays. Oddly enough, you can do something like this Christmas tree decorations made from plastic bottles. They will look very attractive not only on a New Year's beauty in an apartment or at school. Snowflakes from bottles are suitable as handmade toys for the city Christmas tree.

It's very easy to make them:
- Separates the bottom of the bottles from its main part, which you will not need
- Paint the bottom of the bottles with white paints to create a frosty pattern. You can sprinkle them with glitter on top
- All that remains is to attach the ribbon and hang the toy on the Christmas tree
DIY Christmas tree decorations made from disks
In every home you can find many damaged CDs, from which you can make wonderful decorations for the Christmas tree. There are several simple but original options:
- Cover a round disc with knitting threads, fringe, fabric, beads or beads:

- Cut the disk into small pieces, and then paste them over an old glass ball or a ball made using the papier-mâché technique:

- Cut out a bell or a Christmas tree from the disk using a stencil, and simply attach braid to the figures. Due to the natural shine of the disc, such toys will look very bright:

DIY beaded Christmas tree toys
Beading is very popular today. This type of activity is rightfully elevated to the rank of high art, because only gifted craftsmen can create beautiful products from small beads. But this material can also be used to make simple decorative items, for example, Christmas tree decorations. In this article we will present several techniques for making New Year's decorations using beads:
- Cover an old New Year's ball with beads
All you need to make such a beautiful ball is:
- Glass bowl
- Glue brush
- Multi-colored small beads or large beads
Coat the ball with glue and roll it in beads so that it evenly sticks to the ball:

- Weave a toy according to the pattern
This option is suitable only for those who know first-hand what beadwork is. Using beads, wire and a diagram, you can create such a beautiful snowflake:
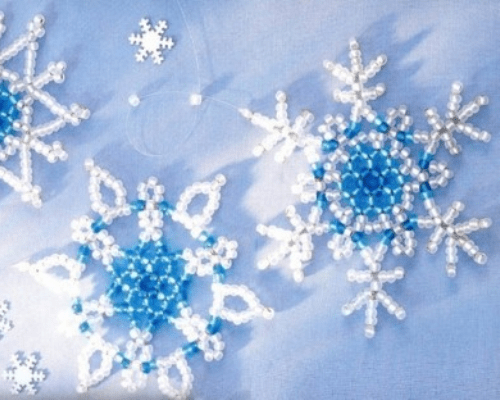
You can safely do this DIY Christmas tree toy for a competition New Year's decorations. Approximate patterns for knitting snowflakes or stars from beads are presented below:


- String beads onto a wire and twist a Christmas tree with a snake

DIY foam toy for Christmas tree
Foam plastic, this is the material from which you can make a large toy for the Christmas tree with your own hands. This material can be processed in any way:
- It can be painted with paints
- Cover with decorative tape or oracal
- Glue beads on him
- Decorate using decoupage technique

Do-it-yourself voluminous Christmas tree toys made from natural materials: photo


Very soon, a blanket of snow will cover the ground and the smell of New Year's holidays will be in the air. If you have a coniferous tree (pine, spruce, thuja) growing in your yard or dacha, then it’s time to think about their holiday decorations. Don’t rush to run to the Christmas tree decorations store and buy everything that shimmers beautifully with sparkles. It’s better to make decorations for the New Year’s tree with your own hands. If nothing comes to mind, then look carefully at the photo and read the secrets of making different toys.
Candy
How can a New Year tree exist without a traditional toy? This is the simplest thing you can make. Take cardboard, roll it into a cylindrical shape and wrap the resulting object with bright fabric or colored cellophane. Tie it at the edges. Use tinsel and beads as decorative elements.Present
Another simple Christmas tree toy. To make it, you need to “hide” any old box under wrapping paper, and glue a layer of cellophane on top. Don't forget to tie the package with a beautiful ribbon with a lush bow. This gift looks very good against the background of pine needles.
Ball
As a base, take a regular foam ball and cover it with pine cones mixed with small balls of beige sisal. All components are attached to the foam with a silicone hot gun.
Herringbone
To make this toy you need to take dense polyethylene in green and white shades. Cut it into square pieces and form each into triangles. Using a glue gun, glue the blanks onto the base so that you get a Christmas tree.
Big star
This toy is made from ordinary twigs. Fold the cut branches into a star shape and tie them with wire. The most fragile areas should be additionally coated with silicone. Sprinkle the craft with artificial snow and decorate with pine cones, acorns, and plastic snowflakes.
Snowman
Cut out a snowman figurine from a thin sheet of foam plastic using a stencil. It is best to do this work with a stationery knife. Draw the hat, scarf and muzzle with acrylic paints.
Cockerel
The basis for this bird, as well as for the snowman, is polystyrene foam. But it is made not only with paints, but also with sequins, rhinestones, and half-beads.
Star
This toy can be mastered by anyone who knows how to sew. It is made of waterproof fabric. You need to cut out 2 identical blanks, sew them and fill them with padding polyester. Tinsel is sewn along the edge of the star, and bows are sewn onto the fabric.
Snowflake
Another foam toy. If you like it, do it like this: using a stencil, cut out a snowflake with a head, and then paint the blank on both sides with acrylic paints. The wind will twirl the toy, but no matter how you look at it, it’s still beautiful.
Little star
Such a toy can be made from hardboard or wood. To do this, cut out a star, paint it golden and decorate it with sparkles. To secure them, drill small holes in the corners. This toy looks very original.
Ball
The pine cones in this craft are fixed on a foam ball. There are also red beads that imitate small berries.
Bell
Take a cardboard blank as a basis. Cover it with cellophane and decorate it with floral mesh, and tie a bow of golden ribbon on top. This bell looks very cute.
Rooster
Cut the base from thick cardboard or hardboard. As decoration, you can use self-adhesive film and colored cellophane.
Ship
This toy is made from the same materials as the previous one. You need cardboard blanks covered with self-adhesive film. The waves on which the boat will sail can be made of blue tinsel.
House
Take 1 large box and 1 small box. Decorate them with wrapping paper, glue white fabric and tinsel of the same color on top and bottom. The small box is connected to the large one using silicone, resulting in a house with a porch. Near it you can attach a figurine of Santa with a bag of gifts in his hands.
Watch
The base of this toy is cut out of hardboard using a stencil. On the dial, draw houses, windows, Christmas trees in the snow, a snowman, children or something of your own. In the center of the clock, glue arrows that will show that the New Year is about to come.
Chick
This cute toy is made on an oval-shaped foam base. It needs to be covered with strips of white polyethylene. Paws, wings and scallops can be made from self-adhesive film and cardboard.
Father Frost
No one will guess that there is a five-liter bottle inside this one. Want to make one like this? Then find a suitable plastic container and paint it with paint from a can. You can use blue and white. Make the beard and hair from foam balls, fixing them with silicone. The nose will be a bottle cap, the eyes can be bought at a craft store, and the mouth will be a piece of red plastic. The craft is decorated with silver tinsel.
There is still plenty of time before the New Year; you can make all these decorations and even come up with something of your own. The more crafts you make, the more elegant the street spruce or pine tree will look.
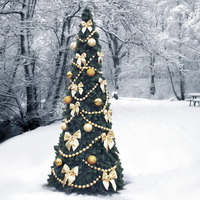
The main attribute of decorating a festive city during the Christmas celebrations. Decorated with toys and colorful alluring lights, it pleases the eye and brings a feeling of celebration to the city's snow-covered streets.
In this review, we will tell you how decorating a high-rise spruce tree differs from its interior counterpart and will analyze the difference between barrel and frame structures.
Trunk and frame spruce trees - design features, differences


To make your spruce look royally luxurious, complement the decor of the fluffy branches with large plastic beads and bows made of soft frost-resistant material. And your Christmas tree will take on a luxurious and elegant look.


4. Penoflex toys
These Christmas tree decorations are ideal for outdoor decor. They are frost-resistant, can withstand bad weather, are catchy, light, shiny and inexpensive. In addition, penoflex snowflakes and stars look great in ceiling compositions and the decor of shop windows and shopping centers.
You can choose any shape, color and size: snowflakes, bows, trains, candies, bells, Christmas trees, boots, etc. - the Winter Tale store offers a wide range of penoflex jewelry.


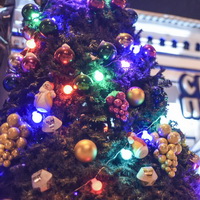
5. Lighting
So, we have examined in detail the variations of daytime design. When it gets dark, even the biggest and brightest toys are invisible. Therefore, it is necessary to separately think over the design image for the dark time of day. After all, it is at night, decorated with multi-colored garlands, that it acquires charm, mysterious charm and a truly fabulous look.
For evening lighting, various options for electric garlands are used: low-voltage string garlands, melting icicles (with the effect of a flowing drop), garlands with shaped attachments, for example, multiballs or ready-made kits, which are the best and most thoughtful option, because... equipped with the necessary devices for connection and various dynamic light modes.
In addition to the trip to the dacha, I was dumbfounded with a task in kindergarten. From time to time they pester me with creative tasks, but on the one hand I love them and cannot refuse. Either I sculpt a project on patriotic education among my daughter, then I make 50 origami doves of peace, or I conduct a home photo shoot for a collage about the physical education of a child (we jump on a trampoline, try to spin a hoop).
I’m already starting to be afraid of school, they say they generally like to bombard me with tasks of this kind. Well, one of the last assignments is not only for me, but for three parents from each group. In every district of our city they put up a Christmas tree, and there is the main Christmas tree of Yekaterinburg. We needed toys for our regional Christmas tree. From time to time, the district administration strains kindergartens with such tasks. Well, kindergartens stress us, the parents.
In general, they gave me a week of time and a task - a DIY Christmas tree toy, preferably a New Year's ball, about 30 cm in diameter, white, blue or silver, or all of them, weight up to 1 kg. Rope length 40 cm.
I decided to go the “beautiful and budget toy” route. That is, you could stupidly find a ball for games in a store with a diameter of 30 cm or so, stick something around it and go ahead. By the way, some did. But a creative impulse surged within me. I decided to make a ball from what I had at home.
I thought about the idea for two days, scrolled through the Internet, and finally I came up with a plan of action. I decided to take pictures of everything along the way almost from the very beginning; I wasn’t the only one in the vast expanses of Russia who was strained with such a task. Maybe it will be useful for someone - as a master class on making New Year's toys. In the end, you can only take the base, and the decor is your imagination.
So I decided to form a ball out of newspapers. They are easy and free :))))).
While the ball was small, I simply wound one sheet of newspaper after another. But when the ball reached about 15 cm, the newspapers began to unfold. Then I used tape to help and grabbed the unfolding edges with it. Finally my newspaper ball was ready.
But since it had a loose and uneven structure that did not quite reach the shape of a ball, I decided to wrap it with cling film on top.
I wrapped it and realized that the cling film added neatness, but it was still a long way from a more or less sane ball shape. Then I used adhesive tape to help, it is denser. And my ball began to look like something.
Next, it was necessary to attach the rope. Here I made one tactical mistake, but when I realized it, it was too late to change it. In principle, what I did is possible, but only if you don’t have enough rope to hang the ball. No more and that's it. I just took it and very thoroughly stuck the rope to the ball with tape, plus I also grabbed it with threads. But I had enough rope. You could simply wrap the rope around the ball and leave a loop for hanging. The rest is also secured with tape. This design is much more reliable; the rope certainly won’t come off. But they learn from mistakes.
I secured the rope well, and despite the size of the ball, it weighs about 350-400 grams - we weighed it on the scales. Then you need to smoothly move on to the decor. Well, here I have already pulled up the ideas that the Internet inspired me.
For some reason I really liked the balls. Some people simply wrap Christmas tree decorations with threads, add beads, sequins, sparkles, etc. on top and a unique toy is ready. I just had a ball of unattended white yarn lying around at home, which I just couldn’t put somewhere. And here is just the concept of colors - white, blue and silver.
I carefully wrapped my ball in 2 layers of food foil. I also secured it with tape where needed.
But the foil breaks very quickly, so I already used the same white yarn on top. The result is a ball like this.
Then things got easier. This is not the first time I’ve been making a “snowflake” dress out of an ordinary dress for a matinee; I still have a whole bunch of sequins in the shape of snowflakes. Moment glue is also in the form of a gel, almost not smelly, but holds tightly. She didn’t get fancy, she just sent silver stripes across the ball.
When I finished, we made a bow from blue tinsel, which was also found in abundance in a bag of Christmas tree decorations.
My daughter helped me as best she could. We hung this ball up and thought about it.
“He’s missing something,” my daughter tells me.
Yes, it’s missing, but what? - I answer.
Making colorful and cool toys with your own hands is one of the favorite activities of children and teenagers. And in preparation for the New Year 2018, dogs will be able to show their imagination and demonstrate their talents in creating amazing crafts. New Year's toys can be sewn, glued, or made from scrap materials. For example, school students can sew colorful pendants from felt or fabric. But kindergarten students will be able to create interesting figures from colored paper, cotton wool or natural materials. Ordinary light bulbs, threads and balls can also be used as a base. You can use them to make equally original decor at home. But in order for the DIY Christmas tree toy to be really cute and beautiful, it is recommended to study the proposed master classes with photos and videos. Step-by-step instructions will help children quickly and easily create new crafts that will stylishly decorate the beautiful New Year's tree.
Cool DIY Christmas tree toy for a school competition - step-by-step photo instructions

You can create an amazing and non-standard toy to decorate a Christmas tree for the New Year for the competition from any available materials. For example, such a blank made from ordinary wooden clothespins will turn out to be very beautiful and at the same time truly original. From such elements you can make a cool snowflake, which is suitable for decorating school classrooms and assembly halls. The following step-by-step instructions with photos will tell you how to make such a Christmas tree toy for a school competition with your own hands.
Materials for making a Christmas tree decoration for a school competition with your own hands
- wooden clothespins;
- white spray paint;
- glue gun;
- scissors;
- thick paper tape (glossy).
Photo instructions for making a New Year's tree toy for participation in a school competition
- Disassemble the prepared clothespins into individual elements.

- Paint the wooden clothespins with white paint and wait for it to dry.

- Glue a couple of clothespins together as shown in the photo (prepare curly rays for the snowflake).

- Repeat the procedure for the remaining clothespins, leaving only one pair unchanged.

- Glue a cross from 4 blanks.

- Between each pair of rays from clothespins, glue 3 more pairs of rays.

- Cut a small piece of paper tape.

- Glue a small loop from a cut piece of tape between the remaining pair of elements.

- Glue the last ray with tape to the prepared snowflake.

- Wait for the adhesive to dry and, if desired, decorate the finished snowflake with sparkles.

A simple DIY Christmas tree decoration for kindergarten for a competition step by step - master class with photos

Usually, children in kindergarten prepare various paper crafts for the New Year's competition. But when using unusual blanks, you can make an original ball-shaped toy from completely new materials. At the same time, to compete with other students, you can make not one, but several similar pendants. But parents must help children in making them: the use of glue and glitter by children requires special attention. The following instructions with photo tips will tell you how to make such a Christmas tree toy with your own hands step by step for a competition in kindergarten.
List of materials for making your own Christmas tree toy for a children's competition
- glass or plastic blank in the form of a ball;
- silicone liquid glue;
- sparkles.
Photo from a master class on a DIY children's Christmas tree toy for a kindergarten competition

Unusual DIY Christmas tree toy made of paper step by step - master class with photos and videos

Even from ordinary paper you can make an unusual three-dimensional toy for the Christmas tree. In this case, simple decor can be additionally decorated with rhinestones, sparkles, or left unchanged. But in your work it is advisable to use designer paper with patterns: it will allow you to make an original craft quickly and easily. The next master class will tell you step by step how to make a Christmas tree toy out of paper with your own hands, at home in school or kindergarten.
Materials for step-by-step making of Christmas paper toys with your own hands
- designer paper of different colors;
- figured hole punch (large) or figured scissors;
- thread and needle;
- bead;
- glue.
Photo instructions for creating a paper toy with your own hands to decorate a Christmas tree
- Prepare colorful paper with patterns.

- Cut out several shaped circles from paper.

- Layer each circle in half, white side out.

- Glue circles of different types (keep one) until a fluffy ball is formed. At the same time, do not glue the last “petals” of the ball together.

- Thread the thread into the needle. Place a bead on the thread, then remove the needle and tie the ends of the thread in a knot.

- Spread the remaining circle with glue.

- Glue a thread with a bead onto the prepared circle.

- Reapply glue to the remaining circle.

- Glue the last circle to the workpiece and wait for the glue to dry.

Video on a step-by-step master class on a DIY Christmas tree decoration made from paper
Another rather unusual, but very cool New Year's tree toy can be made using the instructions below. She will tell you step by step how to make stylish Christmas tree decorations from colored paper for the New Year. Such work can be done not only by schoolchildren, but also by kindergarten students.
DIY funny Christmas tree toy dog made from a sock - step-by-step photo instructions

A small figurine in the form of a symbol of the coming year is the best decoration for the New Year tree. At the same time, you don’t need to spend a lot of time making it: such a toy can be made from an ordinary sock in literally half an hour. Both teenagers and primary school students can work with available materials. They just need to carefully study the proposed instructions with photos and find out how to sew a Christmas tree dog toy with their own hands without much difficulty.
List of materials for sewing a toy in the shape of a dog for decorating a Christmas tree
- sock;
- buttons;
- felt;
- needle and thread;
- filler;
- scissors.
Instructions with step-by-step photos of making a dog toy from a simple sock with your own hands
- Divide the sock into three parts, as shown in the photo.

- Turn the central cut part outward, and then carefully sew one of its edges.

- Sew a large button on the front side of the sewn sock—the dog’s nose.

- Fill the center of the sock with padding polyester and then sew up the remaining free edge. Thus, the finished part will become the body of the dog.

- Cut the remaining pieces of the sock into smaller pieces, as shown in the photo. These will be blanks for the hind and front paws, tail, ears.

- Divide the remaining pieces into halves and sew paws, a tail and a pair of ears from them.

- Sew ears, front and hind legs, and tail to the finished body.

- Cut circles out of felt and place them under small eye buttons. Sew these blanks to the dog's head.

- Flatten the filler and, if desired, attach a ribbon collar to the dog.

How a child can make a Christmas tree toy at home with his own hands - photos and videos

From paper and available natural materials, you can make a variety of crafts that will help you decorate your Christmas tree in an original way. For example, you can make beautiful birds in nests from ordinary nuts and various purchased decor. You can only decorate a Christmas tree with them for the New Year, but you can also use them to decorate your home. At the same time, such crafts are glued together easily and simply. You can learn more about how a child can make a Christmas tree toy with their own hands at home in the following step-by-step master classes with photos and videos.
Materials for a child to make a DIY Christmas tree toy at home
- walnuts, hazelnuts, almonds;
- New Year's decor (small Christmas trees, wreaths);
- glue gun;
- beads;
- plasticine;
- flexible twigs or straw;
- artificial moss (can be replaced with colored green cotton wool).
Photo instructions for making your own children's toy for the Christmas tree at home
- Prepare materials for work.

- Divide the walnuts into halves and remove the kernels.

- Glue small handles made of straw or flexible twigs into each shell.

- Glue almonds or hazelnuts into the shell nests.

- Glue artificial moss inside the shells.

- Glue mushrooms, twigs and other “natural” decor to the shells.

- Decorate bird nests with Christmas trees and New Year's wreaths.

- Use plasticine to make beaks for the bird nuts and glue on eyes made of beads. Additionally, you can decorate the birds with feathers and down.

Video lesson on how to create a Christmas tree toy at home by a child
Cool toys from natural materials can be made according to another scheme. The following video tutorial will show you how you and your children can make New Year's crafts for a Christmas tree with an unusual decoration at home. This type of work will certainly appeal to both preschoolers and elementary school students. With the help of such crafts, kids will be able not only to decorate the house, but also to take part in New Year's competitions.
How to make a Christmas tree toy from threads and a ball for school, kindergarten - photo and video master classes

Working with threads and balls allows both kids and teenagers to make cool, bright crafts for the Christmas tree. Acrylic threads can be considered the best to use. They fit well on the surface of the ball and even after drying have a bright color. Such crafts are great for kindergarten work: kids will be able to make beautiful crafts without much difficulty. The following instructions with step-by-step photos and videos will help you learn how to make a Christmas tree decoration from threads and balls at school and kindergarten.
Materials for making toys for a Christmas tree at school or kindergarten from threads and balls
- multi-colored acrylic threads;
- liquid starch for clothes (can be replaced with a slurry of potato starch and water);
- flour;
- air balloons.
Photo lesson on making Christmas tree decorations from balls and threads for kindergarten and school

Video instructions for making toys from threads and balls for a Christmas tree in school and kindergarten
You can use thread balls not only to decorate a Christmas tree, but also to decorate your home or school. From such blanks it is quite easy to obtain full-fledged garlands. But to make the garland neat, you need to make balls of the same size. You can learn how to make such blanks for the New Year to assemble original decor in the following video instructions.
Do-it-yourself original Christmas tree toy made of cotton wool - step-by-step master class with photos

Cotton wool makes not only cute appliques, but also no less cool toys for the Christmas tree. From such simple material at hand you can easily make a soft animal: a dog, a bear, a bunny. They will perfectly complement the purchased decor for the New Year's beauty and help create an appropriate festive atmosphere. You can also make small snowballs separately from cotton wool, which will allow you to create a neat decoration composition for the Christmas tree with the overall design. The following master class with step-by-step photos will tell you how to make an interesting Christmas tree toy from cotton wool in the shape of a bear with your own hands.
List of materials for making a cotton Christmas tree decoration with your own hands
- cotton wool;
- silicone glue;
- a piece of black felt;
- thin satin ribbon;
- plastic ball for the Christmas tree.
Master class with step-by-step photos of how to create an original Christmas tree toy yourself

Do-it-yourself bright Christmas tree toy made of fabric or felt - master classes with photos and videos

Both teenagers and high school students can make felt and fabric toys for the New Year. The guys just need to familiarize themselves with the master classes offered below. Simple tips will allow you to sew cool and colorful crafts without much difficulty. It is recommended to work with dense materials that hold their shape well. Then your hand-made felt Christmas tree toy will not wrinkle or deform after many years of use.
Materials for sewing a bright toy from felt and fabric for a Christmas tree
- felt;
- colored fabric with patterns;
- threads;
- needle;
- braid;
- scissors;
- paper;
- pins;
- pencil;
- filler (sintepon or holofiber).
Photo from a master class on making a felt toy for decorating a Christmas tree
- On a sheet of paper, roughly depict a bird with wings. Prepare other materials for work.

- Cut out the parts of the toy from felt and fabric.

- Using black thread, embroider eyes on both sides of the bird.

- Use a pin to secure one of the bird’s wings to the body.

- Sew the attached wing to the bird using a sewing machine or by hand.

- On the other side of the bird, embroider the number “2018” with bright threads.

- Cut a small piece of ribbon and make a loop out of it for hanging the toy.

- Use pins to connect the left and right sides of the toy. Start sewing the parts.

- Leave a small gap for filling the toy and fill it with padding polyester or holofiber.

- Carefully sew up the hole left for filling the toy.

- Sew around the perimeter of the toy with brighter threads, overlapping the edge of the felt.

Video instructions for sewing a fabric Christmas tree toy from bright materials
If felt makes brighter and cooler decorations for the Christmas tree, then fabric with an unusual print will not be difficult to make a craft that can also be used for games. You can prepare for the coming 2018 with both themed New Year toys and non-standard crafts. They are suitable for decorating a home, school or kindergarten classroom.
How to make a Christmas tree toy from colored paper in kindergarten - instructions with photos and videos

From colored paper you can make both simple applique toys and unusual relief crafts. With the help of the master classes offered below, you can create amazing Christmas tree decorations that will definitely decorate the New Year's beauty. Also, similar decor can be made from scrap materials. In this case, thick paper should be replaced with sheets from old magazines and newspapers. Such vintage crafts will certainly stand out against the background of ordinary store-bought balls and streamers. In addition, you can easily make a real garland from a set of simple paper figures. To learn more about how to make a vintage Christmas tree decoration from colored paper quickly and easily, the following instructions will help you.
List of materials for making colored paper toys to decorate the Christmas tree in the kindergarten
- designer multi-colored high-density paper;
- scissors;
- White paper;
- ruler;
- threads;
- needle;
- pencil.
Photo instructions for assembling a toy from colored paper to decorate a Christmas tree in kindergarten

Video lesson on how children in kindergarten can make a bright Christmas tree toy from colored paper
Vintage paper toys can be not only convex, but also simply flat and voluminous. It doesn’t take much time to create them and such work can be done by children’s hands quite quickly and easily. You just need to carefully study the proposed master class with video and familiarize yourself with useful recommendations. If you strictly follow these tips, the finished New Year's toy can become the best decoration for the Christmas tree.
Beautiful DIY Christmas tree toy made from light bulbs at school - step-by-step master class

The simplest Christmas tree decorations are usually made from scrap materials. After all, even a couple of newspapers or magazines that are always at hand can become the basis for an amazing craft. Therefore, the following master class with photos is perfect for school. It tells how you can use light bulbs to make a cute snowman with a hat, scarf and mittens. A cute craft can be complemented with a variety of decor. And if desired, the teenager can repeat the work done and make a whole set of such toys to decorate the Christmas tree. Using a similar scheme, you can make other symbols of the New Year: a dog, Santa Claus and Snow Maiden, a penguin. You just need to carefully study how to make a Christmas tree decoration with your own hands from light bulbs, and carefully follow the step-by-step instructions when making an original and bright craft.
Materials for making your own Christmas decorations from lamps at school
- elongated pear light bulb;
- white and blue acrylic paint;
- a piece of blue felt;
- white pompom;
- glitter glue;
- gouache;
- satin ribbon;
- glue gun;
- scissors.
Master class with photos of schoolchildren making a beautiful Christmas tree decoration on their own

The master classes offered above with step-by-step instructions are perfect for making New Year's decorations at home, at school or in kindergarten. They can be created from any available materials: colored paper, cotton wool or light bulbs. Bright and funny crafts can be made from fabric or felt. Children can make long garlands for the Christmas tree using balls and threads. Regardless of the chosen materials and manufacturing features, a DIY Christmas tree toy made from papier-mâché or an ordinary sock will be truly beautiful and stylish. You just need to follow these recommendations and carefully view the offered videos and photos. Exactly following the tips and directions will help you create magnificent children's toys for the New Year 2018, which will be in no way inferior to the original purchased decor.


