Good day!
Autumn time, the charm of the eyes... Yes, how pleasant it is to walk through the forest when you rustle under your feet. I just want to do something with my own hands for the most beloved person in the world. I hope you guessed who? After all, the kindest holiday is coming soon - Mother's Day.
After all, only mommy will be able to appreciate your gift, which, according to tradition, is given to preschoolers and schoolchildren from year to year. For her, so that they would not bring great joy and happiness. Whether it’s a craft in the form of a paper postcard or something else, it doesn’t matter. The main thing is attention, and how you hand it to her, what words or choose when you meet.
When I was little, I also loved to sit and get busy; once I remember I gave my relatives a pincushion, which I knitted with knitting needles. She turned out to be such a funny little girl. And so many years have passed, and it still stands on the shelf, and needles and pins are stored in it.
And now I myself have two cheerful and mischievous sons, who every year from kindergarten bring me small souvenirs, which I happily accept and cherish.
Just today, you can already think about what you will give your mother on this day, which is traditionally celebrated in Russia on the last Sunday of November. Typically, scrap or scrap materials are used for such work. Probably the most popular product is. Or would you prefer to give it to her? There are a lot of options, let's figure it out.
Any gift or souvenir from children's hands looks quite cute. I think that we all associate our mother with an angel. Therefore, I would like to invite you to make it in the form of a simple postcard. I think you will like this idea too. The only thing you can’t do with children of the first or second youngest group is this charm, because the work will be difficult for them. But with older kids (senior or preparatory groups) they can handle it easily.
Therefore, I am giving you a detailed master class on how to make this souvenir.
We will need:
- photo paper
- scissors
- glue stick, PVA glue
- satin ribbon
- openwork paper napkin
- white paper napkin
- decorative hole punch
- markers or colored pens

Stages:
1. Make a printout on a photo printer with the words: “Mommy! You are my guardian angel". Take the background for the postcard light blue or soft blue. Do the work like this, as shown below, the words should be on top.
Then, with the preschoolers, bend the sheet so that you get a thing that will be rectangular in shape and resemble an envelope. Make two vertical folds.

2. Then use a hole punch to make decorative holes along the side parts. Also make two holes and insert a satin ribbon into them.


5. Cut the blank along it. As you can see, you will get delicate wings.

6. Also roll the handles into a cone from the remaining napkin. And the head is made of an ordinary white napkin in the form of a ball.

7. Then proceed to the next step. On a landscape sheet, draw a circle, and on it a face, and glue paper hair in the form of strips, glue the head to the ball, and then to the body.
Cut the hair with decorative scissors with a wavy edge.
Glue the angel to the postcard.

8. Decorate the craft with rhinestones or sequins. It turned out cute and quite beautiful. Good luck!

Once, I already showed you, here I think it would also be appropriate. After all, anyone, especially a mother, will be happy with such a souvenir with wishes.

You need to take the templates and print them on office paper (if anyone needs them, they are in Word format, please contact me, I will send them by email).

This is what happened, it’s cool)).
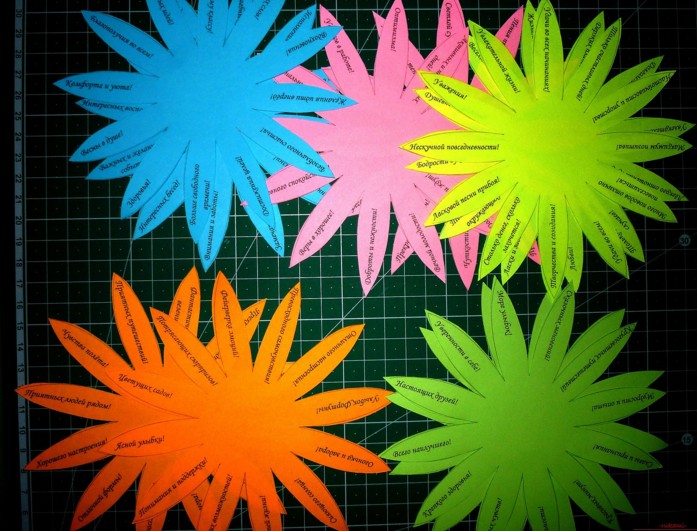
Now all that remains is to assemble the flower, glue all the petals together with a ribbon, and make the middle out of squares.
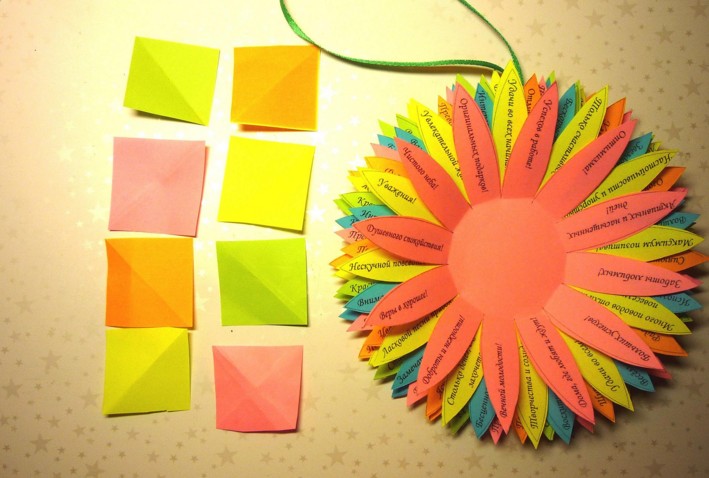
The size of the squares should be 3.5 cmX3.5 cm, fold them like this.


Then bend like this.
Glue all the resulting blanks together, and then glue them to the middle of the flower.

I don’t know about you, but I still often use the word sunshine in my speech. After all, our mother really looks like him. She gets up early in the morning and goes to bed when everyone is already asleep.

We will need:
- template in the form of an A4 sheet
- strips of colored paper
- glue stick
- felt-tip pens

Stages:
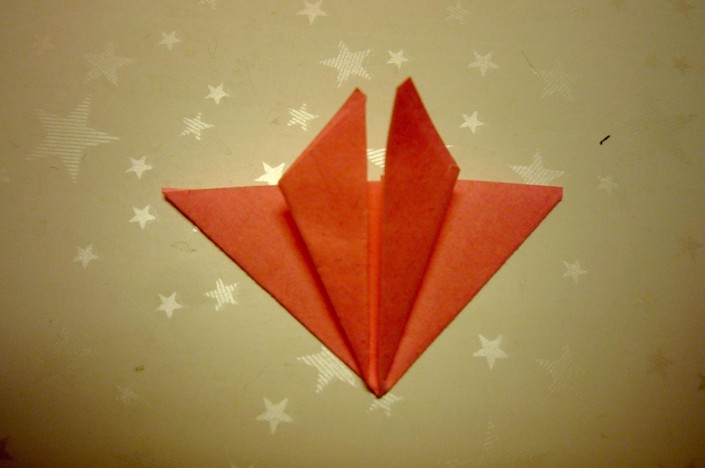
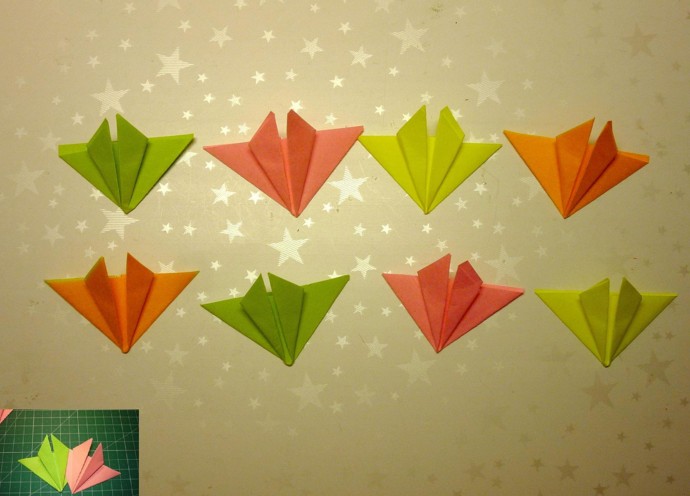
1. Glue rays from multi-colored strips, roll each piece like this and glue the edges.

2. Fold the A4 sheet as shown in this photo. Then glue a circle in the middle and cut it into two halves. Glue the rays to it.
Advice! You can make rays from satin ribbons, but it will be more difficult with them, since they will be difficult to glue to the sheet.

3. Now glue another circle, and it should be yellow, let it dry, draw a face.
Inside the card, write beautiful lines or congratulations for your mother. You can take them, there is a whole collection of poems. Or come up with your own wish.

This is such an unusual and at the same time beautiful card as a gift for mommy on this bright holiday. Good luck!
In a group or in a reception area, you can place the joint work of the teacher and children in the form of palms, and arrange a bright bouquet out of them.

The next option is also very easy, you will need double-sided colored paper, glue, and scissors.

Stages:
1. Take a sheet of green paper and make an accordion out of it.

2. Then find the middle and glue the two parts of the workpiece together to make a lush fan.

3. Now the most creative process, draw any flowers, lilies of the valley or tulips. Maybe even roses. Cut them out.

4. You can give the children ready-made templates, or you can have them draw and cut them out themselves.

5. Then spread the finished pieces on the fan using glue. As you can see, a mini-flower bed has come out that mom or grandma will also like. It will definitely lift everyone's spirits. So, what do you do, creative victories!

A simple DIY gift for mom Paper flowers
The next souvenir I want to show you is paper flowers. They are very often given as a gift for such a holiday, and also for. There are many options, but I would like to show you a bouquet that you can create together with sweets. Cool idea, isn't it?

We will need:
- scrapbooking paper
- any candy
- bamboo sticks cellophane
- glue or glue gun
- scissors
- pencil
- green corrugated tape
- colored ribbons
Stages:
1. Wrap each candy in a plastic bag, like in this picture below. If the candies are flat, then you can even put two pieces.

2. Then, after you have crumpled up the cellophane, take a stick and insert it into it.
 3. To secure the bamboo, you will need green adhesive tape or regular tape. You can also take regular corrugated paper in the form of a long strip and rewind the stick with it. In some places, glue it with glue so that the paper does not unravel.

4. Using a simple pencil, make layouts of flowers and leaves.

5. Now bend each petal up.

6. Pierce each bud with a bamboo stick from top to bottom. The candy will be inside the flower.

7. Now glue each petal, or rather its edge, to each other using a gun.

8. Add more petals to make the tulip even more voluminous.

9. Continue working on the stem and glue the leaves to it. And your souvenir will be completely ready. If you want, you can find even more ideas for such sweet gifts in. Feel free to follow the link.

And the second autumn-spring option in the form of a large basket or pot, but with a lush mass of flowers.
We will need:
- colored napkins of different shades and white
- inflated balloon
- PVA glue and superglue
- any basket
- stapler
- white threads
Stages:
1. Cover the balloon with white napkins and make it look like decoupage. You need to dilute PVA glue in water in the proportions of 0.5 tbsp of glue per 100 ml of ordinary water.
Let the wipes dry completely. As soon as this happens, release the air.

2. In the meantime, while the product is drying, you can do other work. Crumple the yellow napkin (which is already folded four times, they are packed like this in the pack) in half, then in half again. Along the edge, cut out a shape resembling a circle.

3. Also fold the blue napkin in half. Cut out a circle, it should be larger than the yellow one. Cut the edges of the workpiece.

4. Now connect the two pieces with a stapler.
5. Afterwards, gently fluff the flower with your hands. You need to make a whole bunch of such blanks to cover the entire balloon.

6. Decorate the craft with flowers and glue the base to the basket.

For collaboration, you can also do work in the kirigami style. Or decorate a music room or group or classroom with such flowers. You fold a piece of paper in the same way as if you were doing.

The result will please you and never disappoint you. Take note.

Beautiful Mother's Day cards for children. Master classes with diagrams and pictures
This year we even have competitions on this topic. Why not. Therefore, I invite you to take part in it too. Before this, you and I had already made such souvenirs, and then one MK caught our eye, but its shape is not as primitive as everyone else’s. The author tried his best, so go for it, maybe it will be useful to you too.
Stages:
1. Take green cardboard. Bend it almost in half, but leave a couple of centimeters (2 cm).


3. Use a pencil to mark two curved lines to create something similar to a flower pot or perhaps remind you of a trapezoid. Cut along these contours with scissors.

4. Cover the top, which was 2 cm, with a different color or use corrugated cardboard; alternatively, you can decorate it with scrapbooking. Glue a butterfly for decoration.

5. Now you will need another blank in the shape of a fungus.

6. Cover the hat with corrugated leaves and flowers to make it green or light green. And write on the leg.

7. Now insert the fungus into the pot. The result was a craft with a surprise inside.

Also, everyone's favorite asters can also be used in postcards. Take leaves of different colors and cut them into strips 2.5 cm and 3 cm thick. Make a fringe, but do not cut to the end about 5 mm.

You will still need strips 7 mm thick; roll the cores out of them using a toothpick.

Then glue the ends together with glue and let dry. It is to these washers that you glue the prepared fringed strips.


Afterwards, all you have to do is lightly fluff the product with your hands so that the aster comes out.

Make leaves in quilling style.

This work is done in the same way, using a toothpick, only then you need to give the desired shape with your fingers.

In conclusion, you need to think about how you will arrange all the elements and where the inscription with your wishes will be written. The craft can be used in labor lessons in primary school or kindergarten, children aged 5-7 years.

And finally, I would like to give you ready-made blanks in the form of coloring pages.


Crafts for Mother's Day from cotton pads and paper napkins
In fact, to make a craft yourself you don’t need much patience and materials. You can even use improvised materials to create an applique and even a picture. To do this, you can take regular cotton pads, cocktail sticks and straws, etc.
Take the instructions and create, let this time there be calla lilies that will fit perfectly on a plate, for example. This is an excellent option for elementary school students (grades 1-2), but children in grades 3-4 will definitely cope with this work even better.


In the same way, you can do the job and put the flowers in a vase or a regular disposable cup.


Here is another masterpiece, simple and at the same time beautiful.

In addition, you can also adopt these MKs.


And after you learn how to assemble such compositions, build a topiary.


But for kids 2-4 years old, such an application will be possible. Cotton pads will have to be decorated using a pipette and colored paints, or rather a solution of water.

As they say, let your imagination run wild. Then dry the circles and glue them onto the sheets.

If you are a creative person, then you can also use such a cute character, did you know who he is? Yes, this is a guardian angel and, as you can see, it is also made from ordinary cotton wool. See the working steps below.


Or this is a miracle.

Any housewife loves to dress up and decorate the house, and therefore you can give your beloved mother a brooch for her curtain or blouse for her interior.

How to make a craft for mom? (step-by-step instructions for primary school children)
Here is another memorable gift that can show off on your mother’s shelf for a long time. Moreover, it will be unusual, but quite bright. Teachers, take note and create together with the students.

We will need:
- cardboard
- colored wool threads
- flower pattern
- needle

Stages:
1. So, hand out the handout and have the child circle the flower-shaped blank.


3. After changing the thread, take it of a different color.


5. Glue a small pompom in the middle.

Here is another perky and incredibly cute masterpiece. Which is made of little arms and legs.
We will need:
- finger paints
- napkins
- sheet A4
- tubes for juice

Stages:
1. Dip the foot of a child’s foot in paint, and then make a print.

2. Do the same and blot your hand.

3. Cut out the blanks and then glue them onto a stick.


Unusual pasta creations as a gift for mom - quick and easy
Well, such a gift is really unusually cool, and it’s a pleasure to make it. For example, give mom beads of multi-colored pasta. Which can be painted with acrylic paints, but it is better to use food coloring for eggs with the addition of vinegar, or buy ready-made ones.

The easiest way is to place the noodles in bags and add the prepared bright solution to them.

Then put the blanks on a thread and the souvenir is ready.

You can create other souvenirs, for example these. Here are a couple of ideas for you.


If you want, you can also make this year’s new box from this material, and this video will help you. You will definitely like it, all the work steps are clearly shown, use:
By the way, they also lay out entire paintings from pasta. So, you can also create such a composition if you wish.

Children's crafts for mommy in 5 minutes (all new items)
Now let's look at another option made from sticks. Surprised? If you're an ice cream lover, you probably have a mountain of these trinkets lying around. Paint them any color you like and let dry.

Take the photo and cut out the image of the head, glue it onto thick cardboard.

Turn the workpiece over and glue the halves of the sticks onto ceiling tile glue or use a heat gun.

This is such a cute flower, put it in a jar.

Or I can suggest this product, it also looks great. You will get nice daisies.


And now another new thing, it will be a postcard, but it will be voluminous. It looks cool, and it’s very easy to create! See for yourself.
We will need:
- a photo where the baby stretched his hand forward or a picture with the same way
- wire
- tape or glue
- threads
- stationery knife
- corrugated paper: yellow and green color

First you need to make a flower on a wire out of corrugated paper, and then insert it by making a cut in the picture.

Well, another wonderful bouquet.

We will need:
- disposable cup
- building gypsum
- PVA glue or glue gun;
- old newspaper
- thread for fixing the newspaper
- spray paint
- simple pencil
- decorative thread (knitting thread, ribbon, ribbon);
- corrugated paper
- stapler

Stages:
1. Wrap the pencil with decorative ribbon or string. Glue the ends with a glue gun. From the newspaper, form a ball with your hands and stick it on the prepared stick. Tie with thread for a round shape.

2. Make flowers from corrugated paper, fix the middle with a stapler. Fold a sheet of paper several times, and cut out a circle. Make the cuts as we did earlier in this post. Fluff the workpiece.

3. Pour plaster into a glass and insert a stick with a ball. Let it freeze. And then finish the craft, glue the flowers.

4. Charm your mothers with such a wonderful gift. I'm sure she'll like him.

Another idea that I also liked, especially if you are having a party that day. Look how funny the beads turned out.

Or design cool cups.

There is also such an idea from wrapping paper, you can build something like this beauty.

Or you can even take real balloons and make a card out of them.


I hope you will have enough great ideas to make a craft and give it to your beloved mom for Mother’s Day. Be sure not to forget about this day, which is celebrated once a year. I wish you creative success and patience.
Bye everyone and see you again tomorrow.
Best regards, Ekaterina
What to give your mom for Mother's Day? One of the best gifts for every mother can be a homemade Mother's Day card.
And let the craft not stand out for its special accuracy and correctness of manufacture - the main thing is that the warmest feelings and the most sincere desire to please a dearly loved person dear to the heart will be invested in it.
Of course, there are many options for making your own Mother's Day card.
Postcard with a drawing and applique for mom
We present to your attention a very touching card for Mother's Day, made using the technique of drawing and appliqué. We make the base by folding a thick sheet of paper in half. Cut a heart-shaped hole on the front of the card. Decorate it with green paper around the edge. Cut out four hearts from multi-colored paper.

Glue the hearts onto the card. Cut out the word “mother” from paper. Glue each letter onto the hearts. Glue strings to the hearts so that they look like balloons. We decorate the craft with paper butterflies.

On the inside of the card opposite the hole we draw an image of mother and baby with a heart.

We decorate the image of mother and baby with flowers and butterflies. We write a congratulation for mom at the bottom of the card.

Our postcard is ready! It turned out to be very bright and festive on the outside and touching on the inside. A great gift for your beloved mother!

Mother's Day card with palms and flowers
Another wonderful card for Mother's Day is made in the form of open children's hands. We trace the palm and cut out the palm on the fold of white paper according to the template. We expand it. We should get two palms folded together. Glue the palms on the purple background. We cut out the palms from purple paper, stepping back half a centimeter from the edge of the white paper.

We cut out a double heart from red paper and fold it with an accordion. Glue it on the crook of your palms.

Decorate the card with paper flowers.

All that remains is to glue a paper greeting at the bottom. We will make the most tender and touching card for our beloved Mother. Little palms will warm mother's heart even on the most inclement days.

Paper card “Dress for Mom”
For example, you can make an interesting craft that will emphasize the femininity and delicate taste of the mother - for this we use the silhouette of a fashionable dress or other clothing as a decoration for the postcard. To make this design element look more original, we make it in the scrapbooking style from newspaper pages.
So what do you need? A newspaper (book, magazine) page with writing on both sides. You can use a sheet from a music notebook. Cardboard template of the silhouette of blouses, skirts and other women's clothing. If we are making a dress or skirt, we draw them with folds, which will then help give the model volume. It is better to draw the dress separately - the top and the skirt. Bows, beads, rhinestones and other small decorative elements. A sheet of thick white (or milky yellow) paper, a pencil, a ruler, glue and scissors.
Print and cut out the dress templates.

Dress template
First of all, we trace the clothing template onto the written page. Outlining the skirt, we mark the points where the fold lines should go, and then connect them using a ruler.

Let's cut out our product.

We make folds along the lines.

We add volume to the skirt: using a ruler, we form folds so that some of them go inside - like on pleated fabric.

If such a craft is made in kindergarten, we show the kids a master class on creating folds - they themselves will not cope with such a task.

Carefully fold a sheet of white paper in half. We glue our clothes to the title page of the future postcard.

Now let's start decorating our clothes.

We decorate it with various details - bows, rhinestones, beads, pieces of braid.

You can create various compositions: glue on several tops or make one dress - as your imagination dictates.

Card with top and skirt.

Using the same technology, you can make a postcard in a different style - just cut out elements of clothing from a suitable one - for example, a bright colorful one.

Mother's Day card in the form of a dress
There is another option for making a card in the form of a dress for Mother's Day. For such a postcard we will need colored and thin papyrus paper. Fold colored paper in half and cut out a dress from it on the fold. You can glue the dress in two parts.

We fold the papyrus paper like an accordion and glue it in the center in the area of the skirt.

We bend the second half of the accordion.

We fix the second half of the accordion. We should get a multi-layered fluffy skirt.

We decorate the upper part of the skirt with a shiny paper belt. We straighten the skirt of the dress and give it volume. Inside we write words of love and congratulations on Mother's Day.

Here are some different beautiful dresses you can make for your beloved mothers. For every mother you can choose her favorite color!

Postcards - dresses for mom
Cards with dresses for Mother's Day video:
Mother's Day Apron Card


Bookmark as a gift for Mother's Day "Dress"
A lovely souvenir bookmark "dress" can be made from fabric and felt. Draw a dress template on paper and cut out a dress from fabric using it.


Mother's Day card “Scrapbooking with flowers”
A stunningly beautiful Mother's Day card can be made using the popular scrapbooking technique. We make the base of the card by folding a sheet of cardboard in half. Glue a vintage style background with stitches and roses to the front side. Roll up the edges a little.

From old wallpaper and white mesh we make three rectangular blanks. The edges of the blanks should not be smooth and “torn”.

We glue our blanks on the front side of the postcard.

Glue a round openwork napkin on top.

Glue paper flowers, leaves, ribbons and monograms on a napkin. Decorative items for scrapbooking can be found in special sets.

We glue the congratulatory inscription "Mommy". We complement the card with rhinestones.

Here we have such a tender and beautiful card for Mother's Day!

Mother's Day card "corrugated paper flowers"
A Mother's Day card with voluminous flowers made of corrugated paper will be very impressive. To make it we need two squares of purple corrugated paper. Fold the squares in half. We should end up with two rectangles of folded paper.

We wrap one of the rectangles in a tube. We wrap the tube with a second rectangle. We fix the paper with a thread at the bottom. Unfold the top of the paper. We will get a blooming rosebud.

Take a strip of green corrugated paper. We wrap it around the bottom of the bud.

Roll the paper until a long stem is formed.

Cut out a leaf from another piece of green paper. Glue the leaf to the stem. The paper rose is ready!

Using this pattern we make several colors. We put them in a napkin.

We tie a napkin with flowers with bright braid. We fold a sheet of cardboard in half - this is the base of the postcard. We glue our bouquet to the outside. Mother's Day card is ready!

Mother's Day card with roses
You can make a card for mom with a heart and roses. To make it we will need thick colored paper, glue, pencil and scissors.

Roll up the red paper. We make notches on the roll with a pencil every centimeter along the entire length. We cut the roll into notches. We should get paper curls. We fix their ends with glue.

We fold the green paper in half - this is the future basis of the postcard. Glue a pink heart onto it. Fill the heart with chopped bud curls. We form green leaves from folded green paper. A Mother's Day card with a heart and buds is ready!

Card-panel with flowers made of corrugated paper for Mother's Day
For Mother's Day, you can make a very beautiful panel card decorated with flowers from corrugated paper. The basis of the craft will be a circle cut out of cardboard or thick paper. Decorate the circle with green leaves.

Cut out a wavy piece from yellow corrugated paper.

Roll the paper into a bud. We fix with glue.

We wrap the bud with a strip of green corrugated paper. We should now have a flower stem.

We make seven such flowers and glue them to the base. On the back of the craft you can place a congratulations on Mother's Day and even her photo. It will make a very beautiful and memorable gift.

Mother's Day card with foamiran flowers
The basis of the postcard will be a sheet of soft peach-colored cardboard folded in half. Decorate the front side of the card with blue paper and braid. We make a heart out of sequins, inside which we write the dearest word - “mother”.

We cut out petals from yellow foamiran (foam rubber) and paint them. We will get interesting and natural halftones if we paint the petals by rubbing crushed pastel chalk into them.

Foamiran begins to change under the influence of high temperature. We heat the petals on an iron. While the petal is hot, twist it and bend it in the middle, trying to give it a natural look.

Cut out a flower cup from green foamiran. Heat it on the iron and shape it into a cup.

Wrap the wire with green tape or duct tape. We should now have a stem.

We begin to form a bud from the petals, wrapping them around the stem and fixing them with glue.

We make a hole in the sepal, insert the stem into it and fix it with glue at the base of the bud. We make three such flowers.

We glue large roses from the petals.

We cut out leaves from green foamiran. We make veins on them using the same principle - heat them on an iron and apply them to a relief surface (you can use a real sheet). We make small nicks at the ends.

Let's put our composition together. Glue the buds on the stem and green leaves onto the card.

Glue large roses. Inside we write warm wishes for our beloved mother. We made a very tender and beautiful card for Mother's Day!

Card with carnations for Mother's Day
You can draw a Mother's Day card. For example, you can depict bright holiday carnations. First, we make a pencil sketch.

Then paint with watercolors.

Children's voluminous cards for Mother's Day
A very cute and kind card for Mother's Day is a card with a picture of a mother and baby flamingos. In addition to the idea itself, this card has a very interesting execution technique - a combination of a drawing with a three-dimensional appliqué.
On a folded sheet of paper we draw the outlines of the birds. After the paint has dried, glue the pompom. For the flamingo mother - a larger pompom, and for the two babies - very small pompoms. The meaning of these cards is to convey the joy of motherhood to all living beings.
Penguins Mother's Day Card
Young talents can try to draw their mother’s portrait on a postcard.

"Mom" drawing
The main thing is that a postcard for children becomes not just a craft, but a way of expressing their warmest feelings.
Greeting card for Mother's Day.
Making a “Three Hearts” postcard with your own hands. Master class with step by step photos.
Irina Ivanovna Goncharova, teacher of the highest category, OSK Children's Home, Ostrogozhsk, Voronezh region.
Description: The master class is intended for those who like to make crafts and souvenirs with their own hands.
Purpose: as a gift for Mother's Day
Target: making a postcard with your own hands.
Tasks:
- learn to create a composition from various materials;
- promote the development of fine motor skills of the fingers and accuracy;
- to form artistic and aesthetic perception, the ability to implement a plan; - to cultivate interest in holidays and the history of their origin.
A little history: In Russia, Mother's Day began to be celebrated relatively recently.

From generation to generation, for every person, mother is the most important person in life. Becoming a mother, a woman discovers the best qualities in herself: kindness, love, care, patience and self-sacrifice. No matter how many good, kind words we say to our mothers, no matter how many reasons we come up with for this, they will not be superfluous. Various events dedicated to this Day are especially beautiful and unforgettable in preschool and educational institutions, where children give their mothers not only kind words and smiles, but also many handmade gifts. Thank you! And may your beloved children speak warm words to each of you more often. On Mother's Day, remember to whom you owe your life. The most important value.
I bring to your attention a master class on making a postcard for this wonderful day.

Materials and tools:
Red double-sided cardboard, white cardboard for the “heart” template, old postcards, silver silk ribbon (0.5 cm wide), decorative tape (2 cm wide), double-sided tape (transparent and foam), hole punch, regular and curly scissors , pencil, ruler, decorative butterflies and a small heart.

We mark double-sided cardboard (19*28): leave 2 cm on the decorative tape along the edge on the right side. We divide the rest in half (13 cm each). We draw a line in such a way as to bend the cardboard along it. To the left of the center we measure 1.8 cm (the width of the tape). Bend along the line.

You can cut out the heart template yourself.
The main condition is that its dimensions must coincide with half of the top sheet.

Cut out the heart.

We make holes along the edge on the left side with a hole punch.

Next we make holes only on the heart.

I glue it with tape vertically. It will keep its shape.

I glue the decorative tape on the right.
I pass silver ribbon through the holes, tie a bow and secure it.

Using curly scissors, I cut out decoration elements and an inscription from old postcards.

I glue foam tape to all decorative elements.

Decorating our postcard.

This is how it looks in the interior.

Thank you for your attention!
Every country celebrates Mother's Day with great joy, ours is no exception. It is celebrated annually on the last Sunday of autumn. Among the huge number of holidays, this one is special. On such a day, attention is paid to the women who gave us life, the people dearest to everyone - our mothers. Words are the best way to express your love and appreciation, and they can be complemented perfectly by a gift. You can make it yourself.
Mother's Day Cards
If you don’t know what to give for Mother’s Day, make a card with your own hands. A postcard is a wonderful way to congratulate a loved one, and when it is also created with your own hands, it is doubly pleasant.
Card with chamomile
You will need:
- sheet of white paper;
- colored cardboard;
- glue;
- decorative paper with a pattern or a piece of wallpaper;
- pencil;
- stationery knife;
- colored paper.
Now you need to follow these steps.
- Draw a daisy petal template. Then transfer it to paper and cut out about 32 petals and two circles for the core from white paper.
- Bend the petals slightly in the middle and use a pencil to curl their edges outward. Then glue half of them in a circle to one core, and the other half to the other. This way you should have two daisies.

- Glue two flowers together, and then glue a circle cut out of yellow paper into the center of the top one. Fold a sheet of yellow cardboard in half. Draw a flower on any paper that resembles a daisy.
- Carefully cut it out so as not to damage the sheet. Now attach the template to the side of the cardboard that you marked as front, and transfer the design to the center of it. Now carefully cut out the flower.

- From patterned paper or wallpaper, cut out a rectangle the same size as the postcard page, and then glue it inside (if you have a color printer, you can print out the design template below).

- Cut out several thin strips from green paper and curl them a little using scissors. Glue the strips in the upper right corner of the card, then attach the daisy next to them. Draw and then cut out the ladybug and glue it onto the flower.

Flower card
Postcards made using the quilling technique are incredibly beautiful. This technique seems complicated only at first glance; in fact, even a child can make a gift for his mother using it.
You will need:
- double-sided colored paper;
- wooden skewer or toothpick;
- scissors;
- glue.
Instructions for creating a postcard are presented below.
- Cut green paper lengthwise into strips 5 mm wide. Wind one of the strips onto a stick, remove it and let the paper unwind a little. Then glue the end of the strip to the base.
- Holding the circle on one side, squeeze it on the other, as a result you should get a shape that resembles a leaf. Make five such leaves.
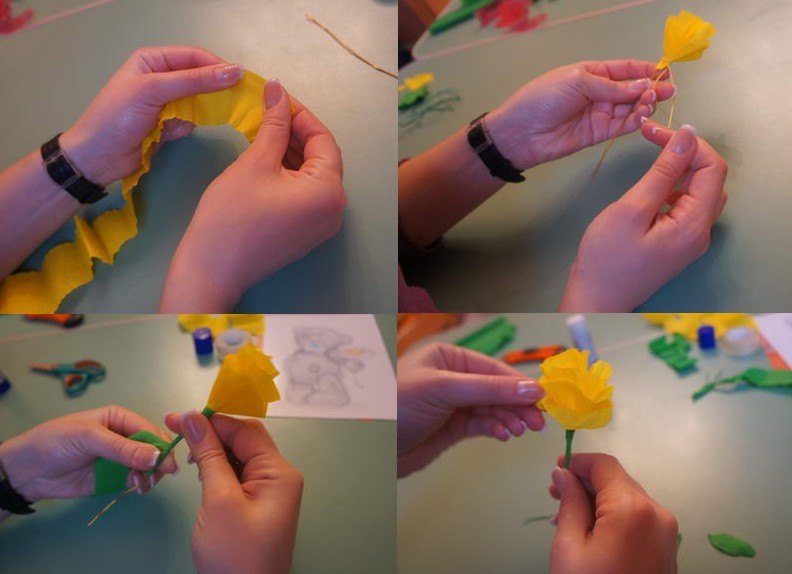
- Now let's start making large flowers. Cut several strips of colored paper, 35 mm wide (cut the sheet of paper lengthwise). Fold the strip 4 times and cut it into thin strips on one side, not reaching the edge about 5 mm.


- Cut strips 5mm wide from orange or yellow paper. Twist one of them tightly and secure its end with glue - this will be the core of the flower. Now glue the lower end of the fringed strip to the core and twist it around.
- Secure the end of the fringed strip with glue and straighten the petals outward using a toothpick. Make the required number of flowers. Small flowers are made in the same way as large ones. The only thing is that the stripes for them should have a smaller width, approximately 25 mm.
- The middle can be made two-color; to do this, use thin stripes of different colors, for example, red and orange.
- Wind a small piece of an orange strip, then glue a piece of a red strip to it, make the required number of turns, then glue the orange strip again, wind it and fix it.


- To make a two-color flower, first make a base for a small flower. Without bending its petals, glue a strip of fringe of a different color and larger size around the base of the workpiece.
- Now you need to make a few curls; to do this, fold the green strip in half. From the bent end, twist it onto the stick, then let it straighten.
- Glue a piece of paper with an inscription to the base of the postcard (a sheet of colored cardboard is suitable), then assemble the composition and secure it with glue.
Wall newspaper
In addition to cards for your beloved mothers, you can make a poster. A wall newspaper for Mother's Day can be made using completely different techniques. For example, a drawing, an applique, a collage from a photo, you can use the same techniques as for making postcards. 

Whatever you decide to make a wall newspaper, be sure to write at least a few warm words and pleasant wishes to your dearest person.
Mother's Day Crafts
Children's crafts for Mother's Day will be a wonderful surprise for all mothers. Older children will be able to make them on their own, and little ones with the participation of adult sisters, brothers, dads or even their teachers.
Paper slipper
High-heeled shoes are a purely feminine thing, so for the main day of all mothers, a craft in the form of them, and even filled with sweets, will come in very handy.
You will need:
- beads;
- colored paper;
- ribbons;
- glue;
- marmalade, dragees or colored caramels;
- scissors.
Instructions for creating a shoe are presented below.
- Print or draw a template for the shoe and decorations for it.

- Bend the parts along the dotted lines and glue them together.


- After the shoe is dry, decorate it with a flower, beads or any other decor. After this, wrap the sweets in a piece of organza or any other transparent fabric and place them inside the craft.

Such crafts for Mother's Day can be made with your own hands from plain paper, but they will look much more interesting if they are made from paper with a pattern.
Basket with flowers
This is a simple, but at the same time very cute craft. She will certainly please many mothers.
You will need:
- three wooden skewers;
- green corrugated paper;
- a couple of paper plates;
- scissors;
- colored paper;
- paints;
- glue.
Your actions:
- Cut one of the plates in half; for greater decorativeness, you can do this with curly scissors. Paint half and a whole plate with regular or pearlescent gouache; you can also use acrylic paints. After the paint has dried, glue the plates together with the middle facing inward.

- Paint the skewers with green paint; they will act as stems. Next, cut the colored paper into equal strips and make loops out of them, gluing the ends together.

- Cut out three circles from colored paper or cardboard and glue four petal loops to each of them.
- Glue the skewers to the back of the flower heads, then cut out three more circles and glue them onto the ends of the skewers, thereby hiding the gluing area. Cut out leaves from corrugated paper (you can also use regular paper) and glue them to the stems.

- Place the resulting flowers into the basket and decorate as you wish.

Mother's Day Gifts
Every child dreams of giving their mother the best gift in the world. For a mother, nothing, even the most valuable thing, can compare with what her child made with her own hands. A DIY gift for Mother's Day can be anything - vases, paintings, appliqués, photo frames, boxes, organizers, decorative items, jewelry. Let's look at some interesting ideas.
Vase from a jar
Even a child can handle making such a vase. To make it you only need a suitable jar, paint, double-sided and regular tape, a photo of the mother or child.
- From cardboard, cut out a fragment equal in size to the photograph; it is better to make its edges wavy. Using double-sided tape, glue the piece to the center of the jar.
- After this, coat the jar with several layers of paint. When the paint dries, remove the cardboard piece - you will have a window.

- Opposite the window from the inside of the jar, stick the selected photo with tape.

- If your jar has a raised inscription, you can add additional decoration. To do this, simply scrape the paint off the bumps with a utility knife.

Photo frame for mom
A good gift for Mother's Day is a photo frame. You can put your mother’s favorite photo in it, this will make the gift even more beautiful and valuable. To make a photo frame, you can use different materials - buttons, shells, cereals, pencils, beads, artificial flowers, coffee beans and even pasta. 
- To create a frame, you can use any ready-made base or make it yourself from cardboard. To do this you will need cardboard from the box, scissors, pencil, ruler and glue.
- First you need to decide what size photo you will make the frame for. After that, add 8 cm to each side. For example, if the photo is 13 by 18, our frame will be 21 by 26 in size. Now draw and then cut out two rectangles equal to the size of the frame.
- In one of the rectangles, draw a rectangle the size of the photo, and then cut it a millimeter closer to the middle of the marked lines.

It’s easy to make a beautiful Mother’s Day card with your own hands by choosing your favorite handicraft method – appliqué, drawing, arts and crafts. Thanks to the ease of execution and a small investment of time, both adults and children can handle the open one.
Required Tools
To make postcards you will need stationery and decorative materials; their list differs depending on the chosen postcard option.
But for all cases you will need:
- Colored and white cardboard;
- Plain colored paper;
- Pearlescent (or coated) colored paper;
- Colored paper with a hologram;
- Double-sided colored paper (for a three-dimensional postcard);
- Glue stick, PVA or heat gun.
For the chosen postcard option, depending on the desired result, you may need materials such as:
- Scrapbooking elements;
- corrugated paper;
- Pompoms;
- Lace;
- Beads or rhinestones;
- Decorative wire;
- Varnish (art or construction)
It is also acceptable to use natural materials, as well as any available means, including some products - cereals, salt, coffee beans and others.
How to make a postcard
The basis for any type of postcard is a sheet of cardboard, folded in half. It can be any format – from A4 to A1.
The emphasis in a postcard, as a rule, is on the design of the title page.
Paper
The simplest version of a postcard is a paper one with flowers.
Necessary materials:
- A sheet of colored cardboard (very thick A4 paper will also work);
- Plain colored paper;
- Mother-of-pearl (coated);
- Colored paper with a hologram;
- Glue stick.
 Making a postcard:
- A sheet of cardboard is carefully folded in half.
- Leaves for flowers are cut out from ordinary colored paper in any quantity; leaves of different sizes are preferred. The shape of the leaves can also be any: in the form of a poplar leaf, elongated, with “teeth”.
- Veins for leaves are cut out of paper with a hologram; you can also draw them with a felt-tip pen or a pen with glitter. The leaves will look more expressive if you outline them with shiny paste.
- Flowers of different colors and sizes are cut out of mother-of-pearl or coated colored paper. For the veins that give the flower expressiveness, as in the case of the leaves, use colored paper with a hologram or a felt-tip pen (pen).
- First, leaves are glued onto the card, then flowers, which are placed organically throughout the space. An interesting idea is to arrange flowers in the form of a horseshoe-shaped garland at the bottom or in the corners of the card, opposite each other. Large flowers look more appropriate in the corners, and small ones closer to the center.
- For one inscription “Happy Mother's Day!” or “Dear Mom” you can use all types of paper, alternating the letters by color and paper texture.
Volumetric (3D)
A Mother's Day card in 3D format is made with your own hands using the same tools and materials as a simple paper one, but using sophisticated techniques. 
Manufacturing instruction:
- Flowers and leaves for the card are cut out of paper, with the edges of the flower petals slightly curled onto a pencil.
- Leaves, previously bent in half, are glued onto the card. In this case, only the edges of the sheets are coated with glue.
- One flower can be glued in 2 or 3 tiers. Thus, only the centers are glued on top of the leaves, thereby creating a 3D volume effect.
- Flower pistils are made from rhinestones, “planted” on PVA glue using tweezers. Pistils cut from holographic paper are no less impressive.
A 3D image can be used to decorate both the title page and the spread of the postcard. The version with a spread is the most original and festive, accessible to both adults and children.
Master Class
A DIY 3D Mother's Day card requires the same tools and materials as the previous two options.
Step-by-step manufacturing instructions are provided:
- From colored paper you need to cut out squares equal to the desired number of colors on the card. The length of the sides of the squares is about 3-5 cm.
- Fold the cut out squares in four, i.e. in half twice. Then bend them diagonally.
- On the multilayer sides of the resulting triangles from bent squares, semicircles should be marked and cut out. When the figures are opened, flowers are obtained.
- 3-4 squares of the same size as for making flowers are bent and half of the leaves of the desired shape for the postcard are drawn with a pencil. The leaves need to be cut out.
- Pieces of double-sided tape are attached to the outer sides of the flower petals to hold them together.
- The cardboard for the card is folded in half, and flowers are attached to the middle of the cover. For gluing, only the “edges” of the leaves are coated with glue.
- The pistils are cut out of colored holographic paper; they need to be glued onto PVA glue using tweezers. You can also replace them with rhinestones, which look more festive.
Postcard options
There is no fundamental difference in the technique of making postcards; they differ only in the chosen material. You should pay attention to the choice of glue. Glue sticks or PVA do not glue some materials firmly, which should be foreseen in advance.
With applique
A Mother's Day card with applique is an option that is recommended to be made by hand for those who find it difficult to cope with the technique of making 3D cards. The applique is usually done on the title side of the postcard, either as an independent decoration or as an addition to other elements. 
For applique, the materials used are already familiar - paper, glue, cardboard, and they can also be supplemented with various improvised means.
For a beautiful and original, but more complex application you will need:
- Matches or dry, even stems of “Bonfire” grass;
- Blanks of leaves from atlas. Such blanks are sold in craft stores;
- PVA glue;
- "Super glue".
The paper applique for a Mother's Day card is glued using a glue stick. The parts are completely coated with glue and carefully smoothed onto the cardboard base of the postcard. A more complex version of the postcard: satin or paper leaves are made in the form of an applique, and flowers are made in the form of a 3D image.
For such a “bouquet” it is proposed to make a basket from dry blades of grass or from matches.
It is done as follows:
- Cut blades of grass or matches are glued to cardboard in the form of a basket weave with PVA glue.
- The lined basket is covered with artistic varnish, which can be replaced with construction varnish, taking into account that it must be applied extremely carefully and in the thinnest layer.
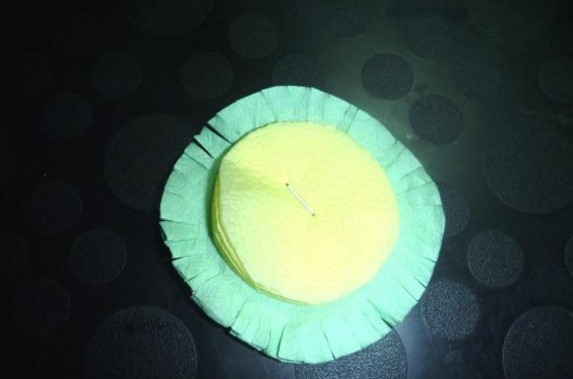
- For each flower, 3 circles of different sizes are cut out into the basket with a fringe that needs to be “twisted” with a pencil. Such fringed circles are superimposed and glued one on top of the other - the largest at the bottom, and, accordingly, the smallest at the top. This should be done so that the fringed petals do not overlap each other, thus, in the final version of the flowers, a petal from one tier alternates with a petal from another.
- After making the flower elements, first the leaves are glued “into the basket”, then the flowers themselves.
If the option with satin leaves for a postcard is not possible, you should make leaves from colored paper. The applique will look more expressive if the flowers are made of pearlescent paper and the leaves are made of regular paper, or vice versa. This will add the visual illusion of a three-dimensional postcard.
Scrapbooking technique
A postcard with scrapbooking for Mother's Day is one of the most successful options, since it conveys the mood of the holiday to a greater extent. You can make it with your own hands in the form of a composition of flowers and leaves.
You will need for this composition:

The instructions include the following steps:
- The white cardboard for the base of the card is folded in half, with the white color inward.
- A glue stick is carefully and evenly applied to the cardboard, after which corrugated paper is glued, the excess of which is cut off.
- Lace is glued along the length and width of one side of the card.
- Using a heat gun or silicone glue, satin leaves and flowers are glued to the lace corner.
This option is also interesting for a postcard: dry inflorescences of grass (“fire” or wormwood), soaked in varnish and rolled in salt or semolina, reinforced with PVA along the lace line or closer to the center of the postcard. They will give the composition originality and completeness.
With corrugated paper
The main role in making cards is played by flowers made from corrugated paper.
Necessary materials and tools for making a postcard:

Making a postcard:
- Squares measuring approximately 5x5 cm are cut from corrugated paper.
- The squares for the flowers are folded in any order. One flower requires 10-15 squares.
- The squares are stapled twice so that the staples are placed crosswise on them.
- A circle is cut out of the resulting square blank.
- To make a voluminous flower, each layer of paper should be “crumpled” towards the center.
- An A3 sheet is folded in half. On it you need to draw or make an applique depicting stems and leaves or a basket/vase. The edges of the image need to be decorated with drawn frames.
- Flowers are glued to the places provided for them on a sheet with a design for them.
You can make a bow from the same corrugated paper and decorate the corner of the card or “tie” it to a bouquet or flower basket.
With flowers
You can make a Mother’s Day card with flowers yourself not only using one technique; it is possible to use combinations of them. A postcard using elements of applique and scrapbooking looks beautiful and original.
For this postcard you will need:

Manufacturing technique:
- A sheet of cardboard for the base is folded in half, and a heart is glued to the center. The distance from the edges of the heart to the edges of the paper should be 8-10 cm.
- Along the right half of the heart, but not to the very top, first the leaves are glued, then the flowers. The flower to match the card should be in the center.
- In the center of the heart, using tweezers, the inscription “To Mom” made of rhinestones is laid out on PVA glue.
- The contours of the heart are framed with scatterings of rhinestones.
It is also permissible to make a small scattering of rhinestones in the lower left and upper right corners. Since in this version the main detail is flowers, 2 small flowers for scrapbooking should be added to one corner with rhinestones, and 1 such flower to the other. Making this card is simple, but requires attention., perseverance and patience.
With a dress
A postcard with a dress is an original option. Dresses made using the scrapbooking technique look most elegant on postcards; they are glued to the postcard with PVA glue and require virtually no additional decoration. But a dress “designed” and invented independently looks more interesting on a postcard for Mother’s Day. 
Necessary materials:
- Paper – absolutely any;
- Simple pencil;
- Ruler;
- Scissors;
- Glue stick;
- A sheet of white or colored cardboard (very thick paper). Its format should correspond to the size of the postcard;
- Lace;
- Any decorative details - rhinestones, beads, bows.
Basic technique for making a dress for a holiday card:
- The details of the bodice and fluffy, flared skirt are drawn separately; fold lines should be marked on the skirt.
- The details for making the dress are carefully cut out. The second set of dress parts, only in one piece, is cut out of lace. On the skirt (the hem of the dress), using a ruler, the folds are formed so that part of them goes inside, as on a regular pleated skirt.
- Details of the product are glued to the title page of the postcard. A lace copy of it is glued on top of the paper dress.
Decorate the dress with decorative details. There are many options: a belt made of rhinestones, in the form of a bow made of satin, made of braid, a brooch on the bodice, a scattering of rhinestones or beads and others. The hem of the dress can be folded from satin, and a lace frill can be glued along the edge. The skirt can have several tiers made of different materials.
2 or 3 different dresses on a postcard will look very original - an elegant and rich dress is placed in the center of the postcard, and more modest styles and designs are placed on the edges. It is permissible to supplement the card with small flowers and/or hearts cut from any colored paper.
With pom-poms
 You can make your own Mother's Day card using decorative pom-poms.
 A card with pom-poms for Mother's Day is an original option, and in order to make such a card with your own hands, you should prepare all the materials in advance. Pom-poms for needlework, both fur and thread, are sold in specialized stores. You can also make pompoms from threads yourself.
To do this, take the following steps:
- Take two “rings” cut out of cardboard, place them on top of each other and wrap them with yarn.
- The threads are cut along the edge, and the resulting bundle is tied in the middle.
- The thread bundle should be fluffed and the pompom is ready.
The size of the pompom depends on the thickness of the cardboard rings, as well as the quantity and quality of yarn. The thicker the rings and threads, the more voluminous the pompom will be. An interesting flower arrangement is made from many small pom-poms. For such flowers, a basket from the version of a postcard with an applique is appropriate. A themed version of the postcard – “Hen with Chicks” – is perfect for Mother’s Day.
Materials and tools for making postcards:
- Yellow pompoms - 1 large and 1 smaller, several very small pompoms for making chickens;
- PVA glue;
- "Super glue";
- Tweezers;
- Colored paper with a hologram. Its function in a postcard can also be performed by felt-tip pens;
- Small black rhinestones.
Making a postcard goes like this:
- A sheet of colored cardboard is folded in half, large pompoms are glued onto it so that they form the body of a chicken.
- Next to the chicken are chickens made of small pompoms.
- “Paws” and “combs” made of paper are glued to the places corresponding to the image for them or drawn on with a felt-tip pen directly on the postcard.
- The “eyes” are glued with tweezers onto “superglue”, using black rhinestones for them.
Pompoms are also used in this version:
- Take 2 sheets of paper.
- At the top and bottom, 2 pairs of holes are pierced in the sheets with a hole punch, through which the sheets are fastened with two laces, onto the ends of which pom-poms are sewn on strings and tied with a bow.
There is a huge scope for designing a postcard; it is permissible to use all the options described above, but the presence of pom-poms on the title page is desirable for the “balance” of the composition.
With the birds
Making a card with birds for Mother's Day with your own hands is also appropriate. Birds can be on a postcard either as an addition to the composition or as its main element.
Materials and tools:

Making a postcard:
- 2 bird figures are cut out from two types of paper. The bird figures must be of different sizes and for the largest of them it is necessary to make 2 wings separately.
- The birds are glued onto the postcard so that the smaller one is “pressed” to the larger one.
- The wings are glued to the body of the larger bird in such a way that the large bird “hugs” the small one.
- The eyes and beak for both birds are drawn on with felt-tip pens on the postcard.
Mother's Day cards can be made using any available materials and simple office tools. The techniques for making each postcard vary in complexity and require creative imagination and attention.
Video on how to make a card for Mother's Day with your own hands
How to make a three-dimensional card with flowers, watch the video:
DIY card for Mother's Day:


